Table of Contents
If you paint miniatures for any length of time, you'll inevitably come to a point where you need to remove the paint from the model. Perhaps it's an earlier paint job you're just not happy with, or you bought some second-hand minis and want to strip the prior owner's handiwork. I collect old miniatures from my youth (Ral Partha, Grenadier, Heartbreaker Hobbies, etc.), not to mention metal Oldhammer models. For me, paint removal is a necessary, and important part of the hobby.
Back in the old days, I used brake fluid to remove paint from miniatures. The process was miserable :( On top of that, I later found out that brake fluid is toxic. Thankfully, I found a safe and easy way to remove paint from miniatures.
How To Remove Paint From Miniatures
Stuff You'll Need
In order to remove paint from miniatures, you'll need a few things. Thankfully, nothing on the list is too expensive or hard to get:
-
Simple Green All-Purpose Cleaner. Make sure you get the concentrated formula. You can buy a 67 oz bottle of the stuff for $5.96 (just like in the picture below). If you have a lot of minis to strip, you can get a 1 gallon jug for only a few dollars more. The cool thing about Simple Green is that it's non-toxic and biodegradable (unlike brake fluid). For the sake of convenience, I buy mine at Walmart, but I've seen it for sale at Home Depot and Lowes as well. Note: Even though Simple Green is non-toxic and biodegradable, it's still a chemical used for cleaning everything from countertops, appliances, and laundry. Simple Green is recognized by the US EPA's Safer Choice Program as safer for people, pets and the environment, but caution must still be used when using the product. The manufacturer's instructions should be followed and personal protective equipment should be worn (safety glasses and disposable gloves -- more on that below). Removing paint from miniatures should be done by adults or under adult supervision in a well ventilated workspace.

- An old plastic container with lid. I repurposed a sliced deli meat container and wrote "Paint Remover" on the lid so it's easily identifiable and won't accidentally get thrown out.
- An old cookie sheet or newspapers. Removing paint from miniatures gets messy, using an old cookie sheet or newspapers on your work surface will keep cleanup to a minimum. Helpful Tip: An old cookie sheet can also double as a protective surface to prime miniatures on. I've been using the same cookie sheet for over 10 years now, and its proven to be an invaluable part of my miniature painting toolbox.
- An old toothbrush or nylon brush. Removing paint from miniatures is easy, but it does take elbow grease. Try to find an old toothbrush with firm bristles (a soft bristle brush doesn't work very well for removing paint -- trust me) or use a nylon hobby brush. You can find small hobby brushes at most hardware and home improvement stores. Helpful Tip: You can use a brass brush with soft bristles (like in the picture below) to remove paint, however make sure the bristles are soft and flexible. NEVER use a steel brush or a metal brush with firm bristles. Your minis will scratch and look like they lost a fight to a gang of sharp-clawed, angry cats. Hiss!

- Disposable gloves. When removing paint from your miniatures, your hands will get wet with Simple Green. Even though the cleaner is non-toxic it's not advisable to bathe your hands with the stuff. Disposable vinyl or nitrile gloves are your friend, and can be purchased just about anywhere (Walmart, Walgreens, etc.).
- Paper towels. Removing paint is easy, but as mentioned earlier, the process can get messy. Having a roll of paper towels on hand will make cleanup easier as you go.
- Safety glasses. Make sure you wear a pair that offers full coverage (direct and peripheral eye protection). Scrubbing to remove paint from your miniatures may flick bits of paint and Simple Green upwards, so it's important to protect your eyes.
- A cup of water. As you scrub your miniature, the Simple Green will foam up and it will be hard to see what your doing. I periodically dip my mini in water to rinse away the foam, then start scrubbing some more.
The Easy Steps Of Paint Removal
All right! That wasn't too bad. Once you have everything you need, it's time to get to work. Helpful tip: I do my paint removing projects in the garage. Personally, I don't mind the smell of Simple Green (to me, it smells like licorice), but my wife hates it. To keep her happy (and to give me space to make a mess), the garage works best for me. Regardless of where you work, just know that removing paint from miniatures can get messy and you should have good ventilation/air flow at all times (even if you don't mind the smell).
In Case You Missed It: Dragonborn Mage Headlines New Dark Sword Miniatures Release
Here's how to remove paint from miniatures:
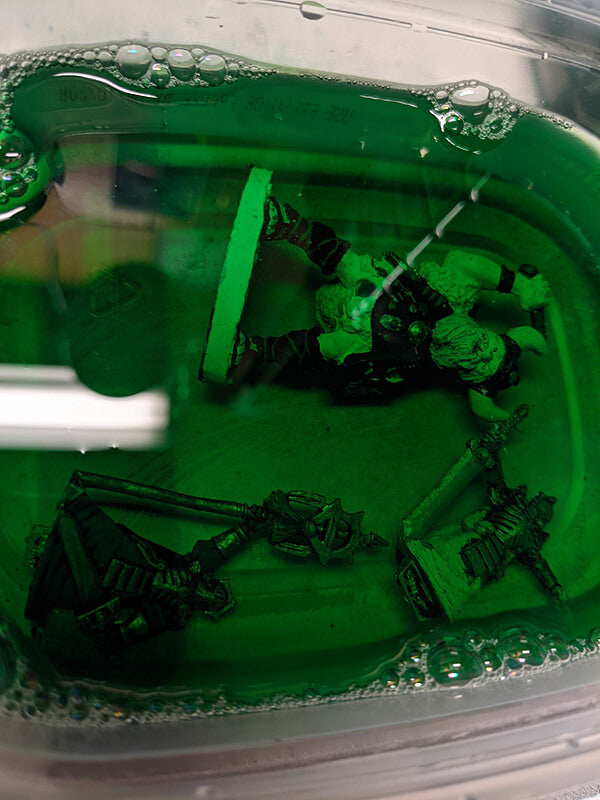
- Put on your safety glasses and pour some Simple Green into your plastic container. You're basically creating a Simple Green bath to soak your minis.
- Carefully place your miniatures in the container. Make sure the minis are completely submerged in the Simple Green (no bits sticking out), then seal the lid.

- Let your miniatures soak for at least 48 hours. Waiting is the hardest part, but you need to give the Simple Green time to work its magic, so plan accordingly. Note: 48 hours is the minimum. If the paint doesn't easily remove from your miniatures, you may need a longer soak time.
- After enough time has elapsed, put on your safety glasses and disposable gloves. Pluck a miniature from the Simple Green bath and gently scrub with your brush of choice. This is the cool part: the old paint will slough off like snake skin and you'll see the original mini underneath. Helpful tip: As mentioned earlier, the Simple Green will foam up as you scrub. Rinse the mini in water now and then so you can clearly see the miniature and check the progress of your work.
- Try to remove as much paint as possible. Old paint can be stubborn and hide in crevices and folds of cloaks, etc. so take your time and try to do the best job you can. It's all right if some paint still remains on the surface (it's rare to able to remove all the paint from a miniature). Just be sure that any remaining paint is not loose or it will cause problems when you prime the mini later. Helpful tip: Use a toothpick to pry or scratch away bits of paint stuck in crevices and folds. Again, you probably won't be able to remove all the paint, but you'll get most of it.
- When you're satisfied with the results, rinse your miniature in fresh water to remove the Simple Green. Let the mini air-dry, or place in front of a fan.
- That's it :) You've successfully removed the paint from your miniature and it's now ready for basing, priming, and painting.

Final Thoughts
So there you have it fellow travelers: the easy way to remove paint from miniatures. Collecting and painting minis is an amazing and rewarding hobby. If you have any tips and tricks on removing paint (or on the mini hobby in general), please leave a comment below.
Until next time, and as always, happy adventuring!


 https://darkelfdice.com/


